

Downhill mountain biking can be an exciting and exhilarating ride, but it can also be dangerous if you are not prepared. Below I have collected some tips which will improve your downhill mountain biking experience by making sure you are prepared with the right gear, skills, and techniques to succeed.
1. Wear the right downhill gear
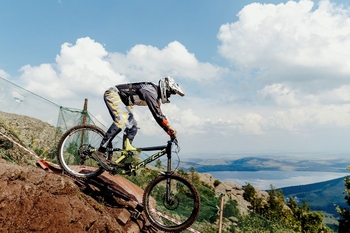
- First the most important body part you want to protect is of course your head. So instead of wearing a helmet on your head, you need to wear a full face helmet. This will give you a lot more protection covering your entire head, over your ears, the side of your face, jaw, and chin. Plus if you were to get into a crash, this type of helmet can handle much more impact than the standard mtb helmet.
- Next you want to protect the front side of your body and the back side of your body. Body armor is the best solution. It is made of very durable plastic plates. These plates protect your chest, back, shoulders, and arms. The plates are all attached to a mesh material allowing you a full range of motion on your bike.
- Then you want to protect your eyes from mud, water, dirt, and gravel from spraying up into your eyes. Goggles will work perfectly with your helmet. It is best to get clear ones and check to make sure they have anti-fog protection. Having a clear view of where you are going down hill is essential.
- After this make sure you are wearing elbow pads and knee pads. Your joints are your own natural shocks for your body. If you injure any one of those joints it will effect how well you are able to ride until you are 100 percent healed. These pads will ensure your joints are protected in case of a fall and absorb the impact placed on your joints.
- Lastly wear full finger gloves. Your hands need to be fully protected especially your fingers because they can more easily break during a crash. Plus full finger gloves will increase your grip. This is crucial when riding down hill as you go over various bumps, small obstacles and uneven ground. You will also be ensured protection from more serious cuts, scrapes, and bruises.
2. Prepare your bike for downhill
- The first thing you want to do is lower your seat. Being able to move your body weight easily while going downhill is very important. You especially want to be able to shift your weight back toward your rear wheel. If your seat is higher then there may be a slight delay in shifting your weight back. Every second counts so keep your seat lower.
- The next thing you want to do is adjust the suspension of your bike. You should soften the suspension so your bike will not bounce as much as it goes down hill. By softening the suspension your bike will be more weighted, grounded, and stable. Your weight will go through the bike into the ground better.
- Then you will want to adjust the psi (pounds per square inch) of both the front tire and the rear tire. This will help your tires to grip the ground more. Reduce the psi by 2 or 3 pounds. This will be enough to allow your tires to conform around roots, rocks, and any small obstacles you may encounter while descending.
- After that be sure to use metallic brake pads. These type of pads are better able to handle the friction that builds up when descending down the hill. Metallic is better able to handle the heat, than resin pads which will lose their strength when friction is increased. Metallic lasts longer and has more stopping power.
- Finally, you want to be sure and use flat pedals. There may be some times that you need to stick out your left or right foot while rolling down the trail. If you are clipped in to your pedals there will be a delay in getting your foot out in time in order maintain your balance. Especially going around corners using one of your feet to brace yourself is a good idea.
3. Assume the downhill body position
The number one thing to remember is the steeper the hill you will be going down the further you should shift your weight back. Have your butt over the rear wheel of your bike. If you do not shift your weight far enough back and you hit a bump shifting you forward you may fly forward over your handlebars.
Keep your upper body low, this makes you more aerodynamic and balanced. You will be less likely to fall over. Stand on your pedals making sure your pedals are parallel to the ground. This is the most stable position for your legs and feet.
As you are standing on your pedals squeeze your bike seat with your thighs. This will give you even more stability and make it easier to shift your weight when you are rolling on rough terrain. The rough terrain demands that you constantly shift your weight fluidly, go with the flow.
Keep your elbows bent and flexible. Don’t relax your weight on the handlebars, one small unexpected bump could have you flying in any direction depending on where your weight is shifted most forward.
Instead transfer your weight into your legs through your pedals and into the ground. Be sure to always look forward, don’t look down or up, do look forward as well as left or right for turns and exits.
4. Shift your weight
Depending on what section of your downhill run you are on you need to master shifting your weight. Stay loose on your bike so you can move your weight forward, backward, left or right. Use your hips and waist to lead the way as you move into various position depending on the terrain.
With your hips ground yourself by pushing off your feet in the direction you want to shift your weight. You always wanted to feel grounded through the pedals so you don’t unweight yourself too much by accident. This is especially true when you are on flat pedals. Flat pedals can sometimes give you a feeling of disconnectedness from your bike if you stop paying attention.
Particularly when you are going down steep hills you have to move your weight in the right direction at the right time. On a very steep section, move your weight to the back and over your rear tire. If you are coming upon a jump move forward a bit so you can jump further and not higher downhill. You want to come back to the ground as soon as possible when there is a jump on a downhill trail.
5. Brake intelligently
As you ride down a steep hill don’t start off going too fast because if you come upon a small obstacle it will make it harder for you to slow down in time in order to avoid it or go over it. Plus you will have more control and bike handling ability by not going super fast.
At the beginning of a steep downhill you want to go in slow by braking a little and then you want to exit that section fast. By going in slow at the start you will build up speed gradually and in control. You want to keep yourself steady and keep your head up while looking for the exit.
As you continue out of the exit, you want to carry and maintain your speed from the previous steep section right through to the next flatter section. So you won’t need to use your brakes.
Another way of braking is you can drop your heels below pedal level. Then have your hips over the back wheel. Now you can just use the rear wheel to slow down when you need to. This will give you a much bigger and more powerful sense of controlling your bike. Plus you won’t need to brake as much.
This technique of using your rear tire to slow down is very effective on corners and off camb sections. This is because you need to come off your front brake, so that your front wheel will have a better chance of gripping the ground.
6. Pick safe lines
When you are riding downhill it is important to relax and flow, the best way to do this is to pick good lines. One type of good line is the one which is smoothest. It has a lot of dirt and your wheels will be able to grip it very well. Use that grip for better control and maneuverability.
Another good line is the one that is the fastest and the straightest. On this line you will need to use your body weight more in order to handle the rougher terrain. Be ready to do bunny hops over small obstacles which are not so rideable but will force you to pick up speed.
Being able to pick good lines is an art and a science. It will be very helpful on more difficult trails and rough terrain. Practice picking line often so you will get better and better. Your instincts will improve for picking line as well. Eventually it will become second nature.
7. Follow other riders
A great way to get better at downhill riding and to be safer is to follow another ride down the hill. You should choose someone who is at a similar level as you, ideally you might want to choose someone who is a bit better and faster than you. This will force you to challenge yourself and you can improve faster.
When choosing a rider don’t pick someone who is a lot better and quicker than you are. This type of rider can be too much for you to keep up with and you could find yourself in a crash because you over did it. A more advanced rider may have you follow them on a very hard line, or have you hop over an obstacle when you least expect it
You can follow a rider who knows the trail very well even if you do not. This way you will be able to see how that rider handles different sections so you can try and copy them. You can also see how the rider handles different sections, then you can ride through those sections but find an easier way of doing it. Make your turns wider, avoid certain obstacles instead of going over them.
In order for you to get a good preview for what is coming next stay a few bike lengths behind the rider you are following. This way, you will be able to make the adjustments you need to make without running out of time. If you are following too closely then by the time you see a new section or obstacle it will be too late to make any modifications to your riding.
8. Use Pumping
Whenever you are making a transition on different parts of the trail you should pump your bike to get through it faster and more powerfully. Good downhill riders try to pump where ever they can especially on jumps.
Use pumping on rougher terrain where you would normally not want to pedal. This is because if you were to pedal you would probably clip your pedals on the ground or on small obstacles. Pumping through this helps you to power through it even though you are not pedaling.
Another technique which is similar to pumping is flattening out the trail. This is where you lower yourself to the bike so you have some bend in your arms and legs. This enables you to be able to push the bike down to the ground on sections like low hills and small obstacles.
This technique ensures that your tire wheels are on the trail more which gives you more grip. This is very beneficial when you are cornering and braking and is best used on very difficult terrain.
9. Conquer steep chutes
Steep chutes can be great fun if you can handle them. As you approach one move your weight to the back of your bike. But don’t go back too far because you don’t want to lift up the front tire. Its a balancing act, you want your weight back while maintaining your front wheel grip.
Next you want to drop your heels and steer your bike using your hips. Your hips are key when it comes to maintaining a good center of gravity. So always be aware of where your hips are positioned.
Keep your head up and look forward, be sure not to look at your front wheel. Look left and right when needed and always be on the lookout for your exit. Flow down the hill and be ready to lightly use your brakes when necessary, hitting them to sharply could cause you to fly over your handlebars.
10. Handling rough straights
Rough straights are when there is a straight away section downhill with small mounds on the trail. You will be going up and down quickly. For this, make sure your weight is centered on your bike. This will allow you to shift your weight forward or backward easier.
If your weight is not in a central position and balanced, this will increase your chances of being bumped around by the small mounds because of the small dips in the trail and you may crash.
Make sure your upper body is not tense, elbows slightly bent, and your legs are in a squatting position. Now you will be able to move up and down with the small mounds like human cushions and pump into the mounds. Move smoothly so everything flows together, body and bike.
11. Use a pre hop
A great time to use a pre hop is when there is a small downhill descent of about five on the trail. Usually riders will just ride down this small dip and then bounce past some uneven spots at the bottom. This is easier, but it will also slow you down and it is not as efficient and smooth.
Instead of doing that give yourself a bit of a kick with a pre hop about 15 feet before you come to the dip. This hop will send you farther down the trail in the air over the downhill dip and past the descent. After which you are on to the next section with more speed and control.
12. Use jumping downhill
There are two types of jumps you can do while going downhill. They are the pop in and squashing on.
When you come upon a long jump on the trail, then you want to pop it. First you want to pre-load your bike suspension and pop it or pump it just before you take off from the jump. This will give you more distance and height over any obstacles that are in front of you.
Next the opposite of popping is squashing. When going over a jump, this time you don’t want to get height, you only want distance. Pretend there is a low over hang you need to stay under after going over the jump.
13. Speed through corners
With practice you can really go fast through downhill corners. Start by braking a little early as you approach the corner. The take off the brakes early as you get into the corner. Weight yourself and push down on your pedals and squeeze your seat with your thighs.
Push your bike around the corner through your heels, really dig into the corner causing dirt to spray out everywhere. This way you go into it and exit it with much as much speed as possible.
Be sure to use these tips again and again and take your downhill riding to the next level.