
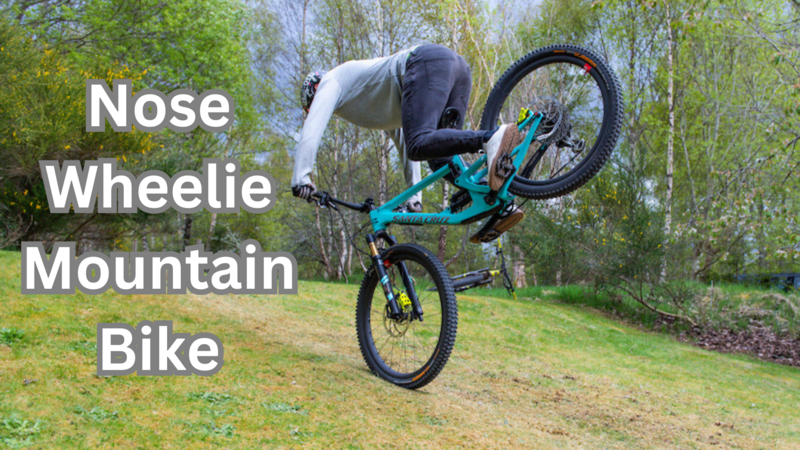
A nose wheelie, also known as a stoppie, is a popular trick among mountain bikers and BMX riders that involves lifting the back wheel of the bike off the ground and balancing on the front wheel.
This trick is achieved by applying the front brake and shifting your weight forward, causing the momentum to lift the back wheel. It’s a thrilling display of balance and control that can add an exciting element to your biking skills.
The term “stoppie” comes from the fact that this maneuver often looks like you’re about to stop the bike abruptly. However, with the right balance and control, you can maintain this position and even move forward, creating the effect of riding on the front wheel alone.
Mastering the nose wheelie after you master how to wheelie a mountain bike can open up a new world of tricks and stunts for bike enthusiasts. However, it’s important to note that it requires practice, precision, and most importantly, safety precautions. As with any biking trick, it’s recommended to start slow, use safety gear, and practice in a controlled environment.
5 Benefits of Learning How To Do a Nose Wheelie on a Mountain Bike
Mastering the nose wheelie, or stoppie, is not just about learning a new trick for the sake of entertainment or showing off. It holds significant importance for mountain bikers for several reasons:
Enhanced Bike Control
Performing a nose wheelie requires a deep understanding of your bike’s balance and how your weight affects it. This understanding translates into better overall bike control, which can be beneficial in various biking scenarios, not just while performing tricks.
Improved Braking Skills
A nose wheelie is initiated by applying the front brake while shifting your weight forward. This helps improve your braking skills and gives you a better understanding of how your bike responds to sudden braking, which can be crucial when mountain biking on challenging terrains.
Increased Confidence
Mastering a trick like a nose wheelie can significantly boost your confidence. This increased confidence can enhance your overall performance and make you more comfortable when trying other advanced biking techniques.
Versatility
The nose wheelie is a versatile trick that can be incorporated into various other stunts, making your biking more dynamic and exciting. It can also be used in practical situations, like navigating tight turns or avoiding obstacles.
Fun and Satisfaction
Last but not least, performing a nose wheelie is fun! The thrill of balancing on your front wheel and the satisfaction of mastering a challenging trick can greatly enhance your enjoyment of mountain biking.
Remember, while it’s important to push your boundaries and learn new skills, safety should always be your top priority. Always wear appropriate safety gear and practice new tricks in a controlled environment.
How To Prepare To Do a Nose Wheelie
Safety
Safety gear is absolutely essential when performing tricks like a nose wheelie on a mountain bike. Even experienced riders can have accidents, and the right safety gear can significantly reduce the risk of serious injury. Here are some key pieces of safety gear that are important when performing a nose wheelie:
- Helmet: This is the most crucial piece of safety gear. A well-fitted helmet can protect your head from serious injuries in case of a fall. Make sure it’s certified for mountain biking and fits snugly on your head.
- Gloves: Mountain biking gloves can protect your hands from abrasions in case of a fall. They also provide better grip on the handlebars, which is essential when performing tricks like a nose wheelie.
- Knee and Elbow Pads: These can protect your knees and elbows from scrapes and bruises during a fall. They can also provide some protection against more serious injuries.
- Mountain Biking Shoes: These shoes have stiff soles that provide better power transfer from your feet to the pedals. They also have better traction on the pedals, which can help maintain control during a nose wheelie.
- Eye Protection: Glasses or goggles can protect your eyes from dust, debris, and insects, ensuring clear vision while performing the trick.
- Body Armor: For more advanced tricks or rough terrains, consider wearing body armor. This can include chest protectors, back protectors, and even neck braces.
Picking the Right Mountain Bike To Do a Nose Wheelie On
Choosing the right mountain bike is crucial when attempting to perform a nose wheelie. The bike’s design and features can significantly impact your ability to execute this trick successfully and safely. Plus it will also help to prevent the wheelie from damaging your mountain bike. Here are some factors to consider:
Bike Size: The bike should be the right size for you. If it’s too big or too small, it can be difficult to control and balance, especially when performing tricks like a nose wheelie. You should be able to touch the ground with your feet when you’re seated on the bike.
Brake Quality: The quality of the front brake is crucial for a nose wheelie. You need a brake that can provide strong and consistent stopping power. Disc brakes, especially hydraulic disc brakes, are generally more reliable and effective than rim brakes.
Tire Traction: Good tire traction is important for maintaining control during a nose wheelie. Look for tires with a good grip, especially for the front wheel. The tire pressure should also be adjusted appropriately; too much or too little pressure can affect traction and control.
Suspension: While a nose wheelie can be performed on both hardtail and full-suspension bikes, a hardtail bike (a bike with no rear suspension) can make it easier to lift the rear wheel. However, full-suspension bikes can provide better control and comfort, especially on rough terrains.
Weight Distribution: Bikes with a more forward weight distribution can make it easier to lift the rear wheel, which can be helpful for a nose wheelie. However, this can also make it easier to tip over the handlebars, so extra caution is needed.
Handlebar Height: A lower handlebar height can make it easier to shift your weight forward, which can help in performing a nose wheelie. However, it should not be so low that it affects your overall control and comfort.
5 Mountain Bikes For Doing a Nose Wheelie
Trek Fuel EX
- The Trek Fuel EX is a versatile full-suspension bike that offers a great balance between uphill efficiency and downhill stability. Its robust front brake system and adjustable geometry make it a good choice for performing tricks like a nose wheelie.
Santa Cruz 5010
- This bike is known for its agility and responsiveness, two key factors when performing a nose wheelie. The 5010’s lower standover height and shorter chainstays allow for easier weight shifting, which is crucial for lifting the rear wheel.
Specialized Stumpjumper
- The Stumpjumper is a popular choice among trail riders due to its balanced handling and excellent suspension system. Its strong front brake and the ability to adjust the bike’s geometry make it suitable for performing a nose wheelie.
Canyon Spectral
- The Spectral is a full-suspension mountain bike that offers a good mix of climbing efficiency and downhill performance. Its responsive braking system and the bike’s overall balance make it a good choice for tricks like a nose wheelie.
Yeti SB130
- The SB130 is a versatile bike that performs well in a variety of terrains. Its lower front-end and efficient brake system provide the control needed for performing a nose wheelie.
Step by Step Guide To Doing a Nose Wheelie on a Mountain Bike
1. Starting Position and Beginning Movements
Starting Position
Begin by standing on the pedals of your mountain bike with your feet level. Your body should be centered over the bike, not leaning too far forward or backward. Your arms should be slightly bent, and your fingers should be on the brake levers, ready to apply pressure.
Speed
Start by riding at a moderate speed. You don’t want to be going too fast, as this can make it harder to control the bike and increase the risk of injury. A slow to moderate speed is best when you’re first learning this trick.
Initial Brake Application
As you’re ready to initiate the nose wheelie, apply pressure to the front brake. This needs to be a smooth and gradual application, not a sudden squeeze. A sudden application of the brake can cause the bike to stop abruptly and throw you over the handlebars.
Weight Shift
As you apply the front brake, shift your body weight forward. This helps to lift the rear wheel off the ground. It’s important to do this smoothly and in sync with the brake application. If you shift your weight too quickly or too far forward, you risk tipping over the front of the bike.
Lifting the Rear Wheel
If you’ve applied the brake smoothly and shifted your weight correctly, the momentum should cause the rear wheel to lift off the ground. At first, aim for a small lift, just a few inches off the ground. As you get more comfortable with the movement, you can start to increase the height.
Remember, the key to a successful nose wheelie is smooth, controlled movements. It’s not about speed or force, but about balance and control.
2. Weight Distribution
Weight distribution plays a crucial role in performing a nose wheelie, or stoppie, on a mountain bike. When you apply the front brake and shift your weight forward, the momentum and shift in the center of gravity cause the rear wheel to lift off the ground.
Here’s a more detailed explanation:
Initial Position
- When you’re riding the bike normally, your weight is distributed evenly between the front and rear wheels. This keeps both wheels grounded and the bike stable.
Applying the Front Brake
- When you apply the front brake, the bike begins to decelerate. However, your body wants to continue moving forward due to momentum. This forward movement of your body weight begins to shift the balance of the bike.
Shifting Weight Forward
- As you lean forward and move your weight over the front wheel, the rear wheel becomes lighter. This shift in weight distribution, combined with the momentum from your forward movement, causes the rear wheel to lift off the ground. This is the opposite of what you would do when doing a wheelie on a 29er mountain bike.
Maintaining the Wheelie
- Once the rear wheel is off the ground, you need to maintain your balance to keep the wheelie going. This involves subtle shifts in your weight to keep the bike balanced on the front wheel. Leaning too far forward can cause you to tip over the handlebars, while leaning too far back can cause the rear wheel to drop back down.
3. Maintaining Control and Balance of Your Nose Wheelie
Maintaining control and balance during a nose wheelie, or stoppie, is a skill that comes with practice and understanding of your bike’s dynamics. Here are some tips to help you maintain control and balance during a nose wheelie:
Smooth Brake Application
The key to a successful nose wheelie is a smooth and gradual application of the front brake. A sudden squeeze can throw off your balance and cause you to tip over the handlebars. Practice applying the brake smoothly and gradually increasing the pressure.
Weight Distribution
Your body weight plays a crucial role in maintaining a nose wheelie. As you initiate the wheelie, shift your weight forward to lift the rear wheel. Once the wheel is off the ground, subtle shifts in your weight can help maintain balance. If you feel like you’re tipping too far forward, lean back slightly to counterbalance.
Look Ahead
Keep your eyes focused on the path ahead, not on your front wheel. This helps maintain balance and also allows you to anticipate any obstacles or changes in terrain.
Use Your Legs
Your legs can act as additional shock absorbers during a nose wheelie. Keep your knees slightly bent and flexible, allowing them to absorb any bumps or shocks.
Practice
Like any bike trick, practice is key. Start with small wheelies and gradually increase the height as you get more comfortable. Practice in a safe, controlled environment, like an open field or a quiet parking lot.
Safety Gear
Always wear appropriate safety gear, including a helmet, knee pads, and elbow pads. This gear can protect you in case of a fall and give you the confidence to fully commit to the trick.
4. Increase the Height of the Back Wheel
Gradually increasing the height of the back wheel during a nose wheelie, or stoppie, is a process that requires patience, practice, and a good understanding of your bike’s dynamics. Here’s how you can work on increasing the height:
Start Small
- When you’re first learning how to do a nose wheelie, start by trying to lift the back wheel just a few inches off the ground. This will help you get a feel for the balance and control required for the trick without putting you at a high risk of falling.
Gradual Brake Application
- The more pressure you apply to the front brake, the higher the back wheel will lift. However, it’s important to apply the brake gradually. A sudden squeeze can throw off your balance and cause you to tip over the handlebars.
Weight Shift
- As you apply the brake, shift your weight forward. The further forward you shift your weight, the higher the back wheel will lift. However, shifting your weight too far forward can cause you to tip over, so it’s important to find the right balance.
Practice
- As with any bike trick, practice is key. Spend time working on your nose wheelies, gradually trying to lift the back wheel higher each time. Remember to always practice in a safe, controlled environment.
Control
- As you start to get the back wheel higher, you’ll need to focus more on maintaining control of the bike. This involves subtle shifts in your weight to keep the bike balanced on the front wheel, as well as careful control of the front brake to keep the back wheel lifted.
5. Safely Ending a Nose Wheelie
Ending a nose wheelie, or stoppie, safely is just as important as executing the trick itself. Here’s how to do it:
Release the Brake Gradually
To lower the rear wheel back to the ground, start by gradually releasing the front brake. This will slow the bike’s forward momentum and allow the rear wheel to descend.
Shift Your Weight Back
As you release the brake and the rear wheel begins to descend, shift your weight back towards the center of the bike. This helps to rebalance the bike and prevent you from tipping forward.
Controlled Descent
Aim for a controlled, gentle descent of the rear wheel. A sudden drop can jolt the bike and throw off your balance, potentially leading to a fall.
Resume Pedaling
Once the rear wheel is back on the ground, resume pedaling to regain stability and control.
Practice
Practice ending your nose wheelies as much as you practice starting them. Being able to end the trick smoothly and safely is a crucial part of mastering it.
What To Do Before a Nose Wheelie, at the Beginning, During and at the End
Before the Nose Wheelie:
- Safety First: Always wear appropriate safety gear. This includes a helmet, knee pads, and elbow pads. Safety gear can protect you in case of a fall and give you the confidence to fully commit to the trick.
- Choose the Right Environment: Find a flat, open space to practice, like a quiet parking lot or open field. Avoid busy roads or trails with lots of obstacles.
- Check Your Bike: Make sure your bike is in good working order, especially the front brake, as it plays a crucial role in performing a nose wheelie.
Beginning of the Nose Wheelie:
- Starting Position: Stand on the pedals of your bike with your feet level. Your body should be centered over the bike, not leaning too far forward or backward. Your arms should be slightly bent, and your fingers should be on the brake levers.
- Start Moving: Begin by riding at a moderate speed. You don’t want to be going too fast, as this can make it harder to control the bike and increase the risk of injury.
- Apply the Front Brake: As you’re ready to initiate the nose wheelie, apply pressure to the front brake. This needs to be a smooth and gradual application, not a sudden squeeze.
- Shift Your Weight: As you apply the front brake, shift your body weight forward. This helps to lift the rear wheel off the ground.
During the Nose Wheelie:
- Lift the Rear Wheel: If you’ve applied the brake smoothly and shifted your weight correctly, the momentum should cause the rear wheel to lift off the ground. At first, aim for a small lift, just a few inches off the ground.
- Maintain Balance: Once the rear wheel is off the ground, use subtle shifts in your weight to maintain balance. Leaning too far forward can cause you to tip over the handlebars, while leaning too far back can cause the rear wheel to drop back down.
End of the Nose Wheelie:
- Lower the Rear Wheel: To end the nose wheelie, gradually release the front brake. This will slow the bike’s forward momentum and allow the rear wheel to descend.
- Shift Your Weight Back: As you release the brake and the rear wheel begins to descend, shift your weight back towards the center of the bike. This helps to rebalance the bike and prevent you from tipping forward.
Resume Riding: Once the rear wheel is back on the ground, resume pedaling to regain stability and control.
Common Nose Wheelie Mistakes and How to Avoid Them
5 Beginner Mistakes
When learning to perform a nose wheelie, or stoppie, on a mountain bike, beginners often make a few common errors. Understanding these mistakes can help you avoid them and learn the trick more effectively. Here are some common errors:
1. Applying Too Much Brake Force
One of the most common mistakes is applying too much force to the front brake too quickly. This can cause the bike to stop abruptly, potentially throwing you over the handlebars. The key is to apply the brake smoothly and gradually.
2. Incorrect Weight Distribution
Another common error is not shifting your weight correctly. If you don’t shift your weight forward as you apply the brake, the rear wheel may not lift. Conversely, shifting your weight too far forward can cause you to tip over the front of the bike.
3. Not Looking Ahead
Some beginners tend to look down at the front wheel or the ground directly in front of them. It’s important to keep your eyes focused ahead, as this helps maintain balance and allows you to anticipate any obstacles or changes in terrain.
4. Lifting Too High, Too Soon
Beginners often try to lift the rear wheel too high before they’ve mastered the balance and control needed for a nose wheelie. Start with small wheelies and gradually increase the height as you get more comfortable.
5. Not Wearing Safety Gear
Some beginners neglect to wear appropriate safety gear. Always wear a helmet, and consider additional gear like knee and elbow pads. Safety gear can protect you in case of a fall and give you the confidence to fully commit to the trick.
6 Tips To Avoid Mistakes When Doing a Nose Wheelie on a Mountain Bike
Avoiding common mistakes when learning to perform a nose wheelie, or stoppie, can make the process smoother and safer. Here are some tips to help you avoid these errors:
1. Gradual Brake Application
- To avoid applying too much brake force, practice applying the front brake smoothly and gradually. Start by riding at a moderate speed and slowly squeeze the brake until you feel the bike slowing down. This will help you get a feel for your bike’s braking system and how much pressure to apply.
2. Practice Weight Shifting
- Spend some time practicing shifting your weight forward and backward while riding. This can help you get a feel for how your weight affects the bike’s balance and how to shift your weight effectively during a nose wheelie.
3. Keep Your Eyes Ahead
- Make a conscious effort to keep your eyes focused ahead, not on your front wheel or the ground directly in front of you. This helps maintain balance and allows you to anticipate any obstacles or changes in terrain.
4. Start Small
- Avoid the temptation to lift the rear wheel too high too soon. Start by trying to lift the wheel just a few inches off the ground. As you get more comfortable with the balance and control required for a nose wheelie, you can gradually start to increase the height.
5. Always Wear Safety Gear
- Always wear a helmet when riding, and consider additional safety gear like knee and elbow pads. Not only can this gear protect you in case of a fall, but it can also give you the confidence to fully commit to the trick.
6. Practice in a Safe Environment
- Choose a safe, controlled environment for practice, like an open field or a quiet parking lot. Avoid practicing on busy roads or trails with lots of obstacles.
Advanced Nose Wheelies
Once you’ve mastered the basic nose wheelie, or stoppie, on a mountain bike, you might be ready to try more advanced techniques like rolling stoppies and no footers. Here’s a brief introduction to these tricks:
Rolling Stoppie:
A rolling stoppie is a variation of the basic stoppie where you keep the bike moving forward on the front wheel for a distance. This trick requires excellent balance, brake control, and timing. Here’s how it works:
Start by performing a basic stoppie. As the rear wheel lifts, maintain your balance and keep the bike moving forward by modulating the front brake. The goal is to keep the rear wheel off the ground while the bike rolls forward on the front wheel.
Practice is key to mastering the rolling stoppie. Start by trying to roll a short distance, then gradually increase as you get more comfortable. Always practice in a safe, controlled environment.
No Footer:
- A no footer is a trick where you take both feet off the pedals while the bike is in the air. This trick can be combined with a stoppie for an impressive display of skill. Here’s how to do it:
- Start by performing a basic stoppie. As the rear wheel lifts, take both feet off the pedals. Extend your legs out to the sides for maximum effect.
- To land the trick, quickly bring your feet back to the pedals before the rear wheel touches the ground. This requires quick reflexes and good bike control.
- As with any trick, practice is key to mastering the no footer. Start by taking your feet off the pedals for just a moment, then gradually increase the time as you get more comfortable.
Remember, these are advanced tricks that should only be attempted once you’re comfortable with the basic stoppie.
Nose Pivot
- Start by gaining some speed.
- Apply the front brake gradually.
- As the bike slows down, shift your weight forward.
- The back wheel lifts, and you balance on the front wheel.
- Turn the handlebars in the direction you want to pivot.
- Use your momentum and weight to spin the bike around the front wheel.
- As the bike completes the pivot, release the brake and resume normal riding.
Conclusion and Tips
Mountain biking is a thrilling sport that offers a unique blend of adrenaline and connection with nature. However, it’s not without its risks, and that’s where the importance of practice and safety comes into play, especially when performing tricks like a nose wheelie.
- The first step towards performing a nose wheelie on a mountain bike is understanding the importance of practice. Practice is the key to mastering any skill, and mountain biking is no exception.
Whether it’s a nose wheelie or a simple ride down a trail, every move in mountain biking requires a certain level of skill that can only be achieved through consistent practice.
Practice helps in building muscle memory, improving reaction times, and enhancing balance and coordination. It allows bikers to understand their bikes better, learn how to handle different terrains, and react quickly to unexpected situations.
- However, practice alone is not enough. Safety is equally important in mountain biking. Wearing appropriate safety gear is a must.
This includes a well-fitted helmet, knee and elbow pads, and gloves. These pieces of equipment can significantly reduce the risk of injury in case of a fall or collision.
Moreover, understanding and respecting one’s limits is a crucial aspect of safety. Pushing beyond one’s comfort zone is part of the sport, but it should be done gradually and sensibly. Attempting a nose wheelie or any other complex trick without proper preparation can lead to severe injuries.
- Lastly, maintaining the bike in good condition is a part of safety that should not be overlooked. Regular checks and timely repairs ensure that the bike performs optimally and reduces the risk of accidents caused by mechanical failures.
Practice and safety are two sides of the same coin in mountain biking. While practice helps in enhancing skills and performance, safety measures ensure that the risks are minimized.
Together, they make mountain biking a more enjoyable and rewarding sport, and they are especially crucial when attempting to perform a nose wheelie on a mountain bike.