
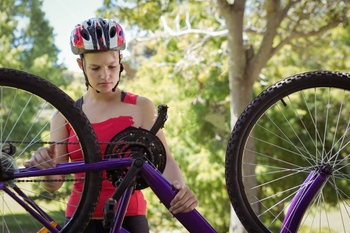

Many mountain bikers are riding along on the trails and suddenly their chain breaks for apparently no reason. Has this happened to you, me to. Let’s investigate.
Why do mountain bike chains break? Mountain bike chains break because of wear and tear, poor maintenance, and gear shifting under a heavy load. Others reasons are because of worn cogs, the chain gets hit, and chain suck. Lastly the teeth of the chainring is bent, not using proper joining pins, and not properly installing the bike chain.
Let’s dive into these reasons and determine exactly how the chain breaks so that this can be avoided.
How Does Mountain Biking Break Your Bike Chain
- Mountain bikers ride on rough terrain and in rough weather conditions. This will cause more wear on a mountain bike chain than a road bike chain. The dirt, mud, sand, snow, leaves, and twigs are all beating up on the chain.
- Over time this loosens the links making them weaker. The terrain of the trail gets into the chain in between the links. Then it can grind against the chainrings wearing away the metal causing rust and abrasions as you pedal faster.
- Not maintaining your chain consistently or properly will damage your chain the longer you wait. If you ride your bike everyday on the trails it causes a build up of dirt, sand, mud, and small gravel. Each day adds another layer and weakens the chain over time.
- Climbing hills is a part of mountain biking. Sometimes you may be climbing and get tire so you need to shift gears. You are pumping on the pedals working your way up the hill and you shift gears. All of a sudden the chain snaps. Your powerful pedaling was too much for the chain, especially if your skipped over some gears when shifting.
- Worn out cogs can cause your chain to skip and get caught between the gears. These cogs on the chainring get worn over time and can even become bent. While pedaling if the constant skipping is not taken care of the chain could get stuck and snap in two.
- Depending on how high or low your bottom bracket is your chain may get hit by small obstacles. Your front tire kicks up small rocks, gravel, sand. You may be riding over roots, your bike shakes which shakes your chain which causes the chain to hit a root. Same could happen going over a rock garden.
- Sometimes your chain might not go straight to the lower rear derailleur jockey wheel, but instead it will not disconnect from the bottom of the chainring and pull up. The inner or middle chainring will suck up the chain until it hits the chainstay. If you are pedaling powerfully and this happens it could break.
- When you are putting on a new chain or putting back on your current chain it is important that you join the two ends of the chain correctly. Any mistake could cause that connection to break away. It is easy to put the master link on upside down or backwards, so pay attention to the proper orientation.
How Do You Prevent Your Mountain Bike Chain From Breaking
The first thing you can do is to change your riding style a bit. Be sure that you shift into the right gear before you get to the hill you are going to climb. Next if you are in the middle of climbing a tough hill and you want to shift, ease up on pedaling then shift.
Both of these tactics will prevent you from braking the chain because of shifting with a heavy load. Also, never stomp on the pedals when the chain is not fully in gear. This increases the risk of snapping the chain.
Use a chain wear indicator and check how much your chain has stretched on a consistent basis. Make sure you check different sections of the chain, not just one section and that’s it. Using a Rohloff gauge, if the curved tooth with the S goes completely into the chain, replace the chain.
There are 12 chain links of a chain which should measure 1 foot. If you measure it and it does not measure exactly 1 foot then it is better to replace the chain.
Whenever you replace a chain, make sure to use a new master link. If you don’t that defeats the purpose of getting a new chain because that old master link will be the weakest link. Also be sure you install the master link correctly.
When you want to clean your chain don’t disconnect and reconnect the chain. This continuous breaking and reconnecting your chain will make that link weaker. Use a chain scrubber and or wipe off the chain with a rag.
When shifting gears don’t use extreme gear combinations such as big front big back and little front little back. This causes the stress to be unevenly balanced out to those links at extreme bending angles.
When you are in one gear the few links curved around the sprocket are in a weaker position than the other links which are straight. Skipping over some gears when shifting adds extra stress to those links that are already bent.
When you replace your chain it is a good idea to replace the cassette. The chain and the cassette wear out at the same rate. If your chain is worn out then so is your cassette. If you replace your chain and not the cassette, this will cause your chain to wear out faster and possibly break faster.
Make sure your change is not loose. Especially when mountain biking you want to have a tight chain. A loose chain depending on how loose it is could hit the ground and hit rocks or roots. Plus you don’t want the chain whipping around or slapping into the frame.
How To Fix a Broken Mountain Bike Chain on the Trails
- The first thing you are going to need is a chain tool. It should be a multi tool and you should carry one with you anytime you will go riding out farther than walking distance from your home or car.
- So your chain is broken, hopefully only one link is broken. But sometimes depending on how your chain broke there may be more than one chain link that is twisted and not useful. No matter how many links are unusable you will need to remove them.
- Take your chain tool and split the chain behind the broken links, so the broken links are not part of the chain anymore. Make sure the two ends of the chain are different so you can connect them. There should be one narrow end and one wide end.
- On one of the ends there should be a pin, push this pin out of the chain, but not all the way out. Just until it is almost all the way out. It should be sticking out of the chain. Use the chain tool to do this. This pin will help to reconnect the chain and hold it together.
- If you have a Shimano rejoining pin it will make it easier to rejoin the chain. It has an extra part that just slides into the chain which holds it in place. You can easily slide the part in.
- If you don’t have a chain tool, then you will need to have a power link. You can rejoin the chain without having a chain tool. The difference is, it relies on two narrow ends of chain. Once the power link is in place, then you can lock it, by snapping it.
- Now we are ready to rethread the chain. First position the derailleur underneath the smallest cog so you will have the most amount of chain slack. Put the chain in the smallest chainring because the pin that is sticking from earlier will not go through the rear mech. Begin threading using the other end.
- Make sure the pin that is sticking out, is pointing out away from the mountain bike. This will make using the chain tool easier. Now rejoin the chain between the rear mech and the chainrings. Using the multi tool wind the chain tool inward until it touches the pin. Then push in the pin with the chain tool.
- Be gentle when you wind the chain tool and push in the pin. Don’t do this too hard or you may get a stiff link which is not flexible. Depending on how many links you needed to remove, your chain is now shorter.
- You won’t be able to use some of the gears because the chain is not long enough. Check which gears you can use before you ride. Now you are good to go, continue on the trails until you get home. Now you should get a new chain.